
Gina Setup
5 Easy Steps
This tutorial is to give you instructions on how to install GINA to be setup for raiding.
NOTICE
You will not find GINA triggers to download here.
This is to setup GINA to receive them from Drakah if you are in the same Raiding Guild. However, you are welcome to use the information if it helps you in your installation.
Do not skim this information, as most who reads quickly who configures GINA WILL miss something and will have an issue receiving trigger packs. This is a reflection on you to be able to follow directions correctly! Don’t be THAT person.
The information below will allow you to automatically receive triggers from Drakah. It is recommended to have your triggers setup several days before raiding to allow for any issues.
Do not wait until the night of raiding to ask for triggers!
Otherwise, you will not be raiding until you are setup.
Do not ask or receive triggers from anyone, other than Drakah, to ensure you do not cause duplicate triggers and/or issues to your emotes. If you are using triggers from another guild, and wish not to use ours, it is your responsibility to not miss any emotes and be able to follow any custom emotes we may add to the event.
If you are having any GINA Issues, view the troubleshooting section at the bottom of the page.
Using EQ Log Parser?
For those users who are using EQ Log Parser, it is slowly adding the ability to incorporate in-game triggers as GINA has been offering. Hopefully soon it will have all of the functionality, but until then, I will continue to keep the GINA triggers updated.
Program still needs:
- In-Game Manual/Automatic Trigger sharing – User management security settings for Create/Edit/Delete of Triggers on-the-fly.
- Ability to do the same as above, but with Sound WAV files.
- GINA Triggers that consists of Timer Overlays needs to be imported as a separate Timer Overlay along with actual triggers.
- Actual Word to Phonetic Word Annunciation
Step 1: Download GINA
or Visit GimaSoft directly at http://eq.gimasoft.com/gina/Download.aspx
If you cannot download it from GimaSoft, try another browser.

Step 2: Add Character
Did you check that you have your log running in EverQuest?
(Type: /log on while in-game.)
 Click the User icon at the upper left to Add a character(s).
 Click the Log File location button and navigate to where your log file is for the character you are adding. By default, it is located at
C:\Users\Public\Daybreak Game Company\Installed Games\EverQuest\Logs- Your character should now be created! Ensure the check-box is checked for Monitor on Startup, select your audio settings for volume/voice, etc. Test it by clicking the Play button and Save.
Your character is created!
You should now be on the main screen of GINA.
Ensure you have a ![]() RED circle to the left of your character name.
RED circle to the left of your character name.
![]() RED CIRCLE: Character is currently being monitored.
RED CIRCLE: Character is currently being monitored.
![]() GREEN CIRCLE: Character is NOT being monitored, you would need to click it to start monitoring.
GREEN CIRCLE: Character is NOT being monitored, you would need to click it to start monitoring.
![]() TRIANGLE: This means GINA cannot find the Log file you selected. Either you did not type /log on while in-game yet or you deleted your log file.
TRIANGLE: This means GINA cannot find the Log file you selected. Either you did not type /log on while in-game yet or you deleted your log file.


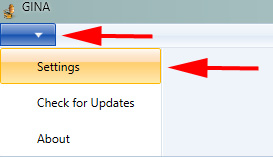
Step 3: SETTINGS
Click the blue button/down arrow at the upper left and choose Settings.
General Tab:
Here you can adjust the Master volume of Gina for the voice, have the program minimize to system tray option, etc.
1. UN-Check the box for “Check for Application Updates during launch”. There will not be any, and it causes lag issues for the program to load up properly.
Sharing Tab (Most important setting):
1. Click on the “Trusted List” radio button button on the left, for BOTH options. This will ensure you are receiving triggers from me DURING an event, without having to you to tab-out of the game to manually “accept & merge” anything.
2. On the right-side, Type: Drakah and click Add. This will place my name into the Trusted Sender List box. Be sure you spell the name correctly and that it shows IN the white box. Click SAVE.
Log Maintenance Tab:
Check-mark “Auto-archive log files”. This will automatically archive your current log file when it reaches the desired size you select and will give you a new log file to use (personally I set it to 50). Warning: GINA can lag if your log file is too big. You can also set to have it delete files too if you wish.
Advanced Tab:
Nothing here to worry about. (no picture needed)

Step 4: Contact Drakah
Ready for the Trigger Packs?
Contact Drakah via Discord!
In the Iratus Lepus Discord Server, look on the right-hand side, scroll threw the users until you see Drakah. Typically, I am listed under the Online list, but if not, look under the Offline list. Find Drakah and left-click – this will bring up the user panel. On the bottom you will see you can Message. Please let me know here that you are ready to receive triggers and we can setup a time/date to do this.
Please ensure you have followed the above steps correctly. Again, 95% of the people fail to receive the packs from something they missed, so MAKE SURE you have done the following:
1. Make sure your log running in EverQuest. Type /log on
Might be a good idea to open that log file and ensure you are seeing guild chat and such in it.
2. Make sure your Character in GINA is pointing to the correct log file and not a different EverQuest installation.
3. Make sure you have your Sharing Tab Settings are correct, with both radio buttons selected for Trusted List and Drakah is listed in the Trusted List box, spelled correctly.

Step 5: Receive & Enable Triggers
Meet Drakah in EverQuest to do the following.
There are 3 folders I can send:
1 – Raids (mandatory)
2 – Guild (recommended)
3 – Class (optional)
NOTE: If you already had GINA installed, and you have triggers already, you need to either re-name or delete your triggers prior to receiving them – otherwise, your triggers will become corrupt!
How to Delete a Trigger:
Simply right-click on a single trigger or right-click on a folder, and choose Delete.
Once you have successfully received the trigger folders, you need to enable the specific trigger folders. You do this by clicking on your character name on the left side. You will see a RED border around your character. You should now see check-boxes next to the folders on the right-side.
You do NOT want to enable everything. Doing so will lag GINA out and potentially crash.
Only enable what you need, that is it.
1. Raids – Click the Arrow to open the folder, and ONLY enable the current expansion. If we do any older content, this is where you would go to enable those temporarily. Notice from the screenshot, there is a Black Box next to Raids. This means the entire folder is not fully enabled but something under it is.
2. Guild – Fully enable this folder. Notice from the screenshot, there is a Check-mark next to Guild. This means the entire folder is fully enabled.
3. Class – Click the Arrow to open the folder and locate your Class and enable that one ONLY. Notice again, there is a Black Box next to Class. This means the entire folder is not fully enabled but something under it is.
THAT’S IT!
You can test the Guild folder by typing in:
/random 100
You should get an emote of what you rolled via On-screen Text & Voice.
You can test the Terror of Luclin folder by typing in:
/say Aten Ha Ra joins the battle.
You should get an emote saying “Boss Active” via On-screen Text & Voice.


Customization
Screen Customization for Text and Timers:
1. Click on the Overlays Tab.
2. Click the little Down-Arrow under Default from the Text Overlays icon and/or the Timer Overlays and choose Properties.
3. Resize/move the window, change the font/font size and click Save on the overlay bar on the upper right – kind of small. Note: If the bar is too big, it will start flickering like crazy.
Voice Customization for select words:
1. Click on the Gmonish Articulator.
2. Click the Green Plus Sign and type in the Actual Word you want GINA to find and type in the Phonetic Word you want GINA to pronounce it as and Click Add.

Copying Triggers to another PC
1. Close GINA on your old PC – Do not have GINA running when you do this.
2. Right-click on Windows Start Button and choose RUN.
Type: %localappdata%
3. Find the GimaSoft folder and copy the folder to a thumb drive or wherever you can access it on the other computer.
4. On the new PC, Right-click on Windows Start Button and choose RUN.
Type: %localappdata%
5. Paste the GimaSoft folder you backed up here.
6. Install GINA and it will load up just like your other PC. You can already have GINA installed when doing this, just choose to Overwrite the folder when you paste the folder.
PS – You can always backup your GimaSoft folder if you need to and keep it in the safe place.

Troubleshooting
Triggers repeating:
1. Close GINA – Do not have GINA running when you do this.
2. Right-click on Windows Start Button and choose RUN.
Type: %localappdata%\GimaSoft\GINA
3. Delete the IKG file.
4. Load GINA and you should be OK.
GINA crashing on startup:
Usually this means there is a corrupted trigger someplace and narrowing it down can be hard. I have found there was a bad trigger in the Class->Druid folder called “Multitaskers”. After I fixed it, GINA no longer crashed. You could surgically edit your GINAConfig.xml file to delete this trigger if you are careful, but I would suggest sending me the ERROR LOG in a tell in Discord so I can take a look at this.
Fresh Installation:
1. Uninstall GINA.
2. Right-click on Windows Start Button and choose RUN.
Type: %localappdata%
3. Find and Delete “GimaSoft” folder (if it exists, which it probably still does).
4. Reinstall GINA and run. Add your character(s) again, edit your Sharing settings, etc. from above.

Other Helpful Notes
Disable Program Updates:
Open Settings, and Disable checking the program for updates. There will not be any and there have been issues and errors because it is checking for it. Just turn it off.

Enable File Extensions:
In Windows, enable to show File Name Extensions. By default, Windows does not do this… WHY, I have no idea… but you need to see which file is an EXE, INI, JPG, etc.

GINA Reinstalling Issue (Aug. 2023):
Please follow the following information concerning GINA creating a White Icon & Constantly Reinstalling after a Windows Update (Aug. 2023):
1. Right-click on Windows Start Button and choose RUN.
Type: %localappdata%
Find and Open folder named “Apps“, then “2.0“
Here you will see a few crazy named folders and a Data folder, which you don’t need to worry about. Inside one of these crazy named folders is what we are after.
2. Look for the one crazy folder that has yet another crazy named folder, that it inside it, has a folder that has many odd named folders. We are looking for one that has about 15 folders inside. One of them starts with “gina.tion_ …”. If you find that you have more than 1 place where this folder resides, figure out which one is the most recent installation, that would be the one you need to use.
3. Open the “gina.tion_ …” folder and look for “GINA.exe“. Right-click on “GINA.exe” and choose “Send To” –> “Desktop (Create Shortcut)“. On Windows 11, you will have to choose “Show more options” first to see this option. (See Screenshot)
4. The Shortcut is now on your Desktop. You can safely delete your Old shortcut that you had, that looks like a white box. Go ahead and rename your new shortcut to “GINA” again, and you are good to go.
5. If you want to take this a step further, you can replace your Start Menu shortcut too.
Right-click on Windows Start Button and choose RUN.
Type: %localappdata%
Navigate to Roaming\Microsoft\Windows\Start Menu\Programs\GimaSoft
Copy your Desktop one and Replace the shortcut there with your new one.
If you Pinned it to your Start Menu, you will need to Un-Pin it, and re-Pin it with the newer version.